Yoga for Back Pain: Simple Poses for Lasting Relief 2024
December 31, 2024 | by paruli6722@gmail.com
![IMG_20241226_175751[1]](https://fitnessformanavta.com/wp-content/uploads/2024/12/IMG_20241226_1757511.jpg)
Discover simple yoga for back pain poses to ease discomfort and achieve lasting relief. Perfect for beginners and anyone seeking natural, effective pain management through yoga for back pain.
Say Goodbye to Back Pain: The Power of Yoga Poses
Are you tired of living with persistent back pain? Yoga offers a natural and effective way to alleviate discomfort, strengthen your muscles, and improve your posture. By incorporating simple yet powerful poses into your daily routine, you can target the root causes of back pain, such as tension, stiffness, and muscle imbalances. Whether you’re dealing with chronic pain or occasional discomfort, yoga provides gentle stretches and strengthening exercises that promote spinal health and flexibility. Say goodbye to back pain and hello to a healthier, more relaxed body with the transformative power of yoga!
Gentle Yoga Stretches to Alleviate Back Pain Naturally
Back pain doesn’t have to control your life. With gentle yoga stretches, you can ease tension, improve flexibility, and strengthen the muscles supporting your spine—all without the need for medication or invasive treatments. These soothing stretches are designed to target tight areas in your back, hips, and shoulders, helping to release built-up tension and promote natural alignment. Perfect for beginners or those seeking a low-impact solution, yoga provides a holistic approach to back pain relief. Discover how these simple yet effective stretches can naturally restore comfort and mobility to your everyday life.
Transform Your Back Health with These Simple Yoga Poses
Your back is the foundation of your body’s strength and flexibility—so why let pain or stiffness hold you back? These simple yoga poses are specifically designed to strengthen your core, stretch tight muscles, and improve posture, all while relieving tension and discomfort. Whether you’re dealing with chronic back pain or just want to prevent future issues, these poses offer a natural, effective solution. With consistent practice, you’ll notice better mobility, reduced pain, and a stronger, healthier back. Take the first step toward a pain-free life and transform your back health with the power of yoga!
Top 5 Yoga Poses for Lasting Back Pain Relief
1.The Camel Pose (Ustrasana): Open Your Heart and Strengthen Your Core
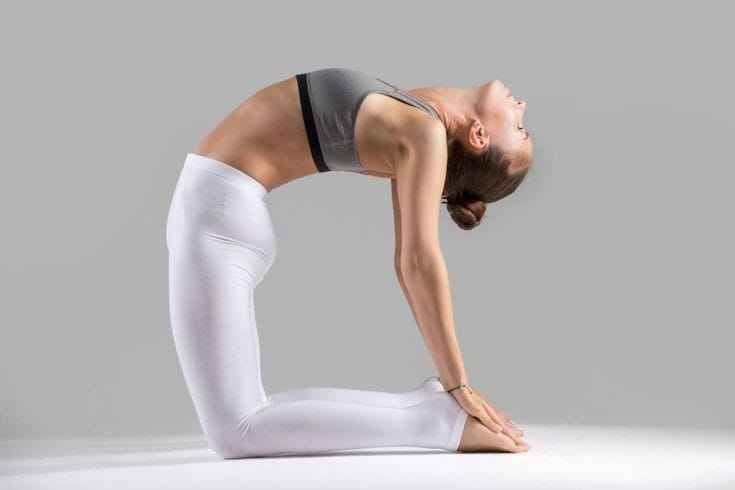
Camel Pose, or Ustrasana, is a powerful backbend that stretches the front of the body, opens the chest, and strengthens the back muscles. It is a great pose for improving posture, relieving tension in the spine, and alleviating back pain when practiced correctly. However, it should be approached with caution, especially for beginners or those with existing back issues.
Benefits of Camel Pose (Ustrasana):
Stretches the Spine and Chest: It opens up the chest and stretches the entire front of the body, including the hip flexors and abdominal muscles.
Strengthens the Back: The deep backbend helps strengthen the muscles along the spine and in the lower back, improving posture and supporting spinal alignment.
Improves Flexibility: Regular practice can increase flexibility in the spine, shoulders, and hips.
Boosts Energy: As a deep backbend, Ustrasana energizes the body and helps improve circulation.
Stimulates Abdominal Organs: The pose can also stimulate digestion and improve circulation to the abdominal organs.
Instructions to Perform Ustrasana:
The Sanskrit word “Ustrasana” translates to “camel pose” in English. This yoga asana is named so because, when performed, the body resembles the shape of a camel with a raised hump.
- Begin in Vajrasana:
- Sit comfortably in Vajrasana with your hands resting on your knees.
- Keep your body upright, maintaining a straight line from your head to your hips.
- Transition to Ardha Ustrasana (Half Camel Pose):
- Gradually rise from Vajrasana to a kneeling position, ensuring that your knees are hip-width apart.
- Place both hands on your lower back, just above your hips, with your fingers pointing downward towards the ground.
- Align your elbows and shoulders so they form a straight line, and make sure your thighs are perpendicular to the floor at a 90-degree angle.
- While inhaling deeply, bend backward from the lower part of your spine, allowing your neck to gently tilt backward without any strain. Stretch comfortably until you feel a gentle pull in the back and neck.
- Transition to Ustrasana (Full Camel Pose):
- Slowly exhale and extend further into the pose by reaching your right hand to hold your right heel and your left hand to hold your left heel.
- Keep your neck relaxed and avoid any sudden jerks as you lean backward.
- Breathe normally and evenly while holding this position.
- Stay in this pose for 10 to 30 seconds, depending on your comfort level.
- Return to Vajrasana:
- Take a deep breath and slowly release your hands from your heels.
- Straighten your back gently and return to the kneeling position.
- Gradually sit back on your heels to return to Vajrasana.
- Breathe in and out deeply to relax your body.
Precautions:
- Individuals with high blood pressure, severe back pain, or neck injuries should avoid this asana.
- Always perform this pose under the guidance of a trained yoga instructor if you’re a beginner.
By practicing Ustrasana regularly, you can improve flexibility, posture, and overall health. Ensure that you approach this asana with mindfulness and respect for your body’s limits.
2.The Crocodile Pose (Makarasana): A Gateway to Deep Relaxation
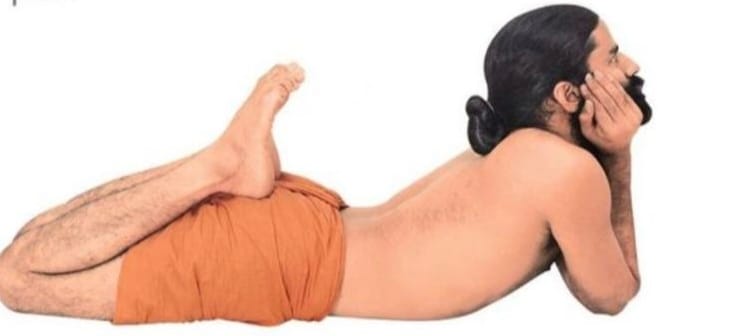
In the fast-paced world we live in, finding a moment of peace and relaxation is often challenging. Yoga offers us various tools to achieve this, and one such practice is the Crocodile Pose, or Makarasana. This simple yet highly effective pose is a cornerstone for those seeking to improve their breathing, reduce stress, and foster overall well-being.
What is Crocodile Pose?
The Crocodile Pose derives its name from the relaxed and grounded posture of a crocodile lying by the riverbank. Makarasana is classified as a restorative yoga pose that promotes deep relaxation and is often used to prepare the body for pranayama (breath control) or meditation practices. It is particularly beneficial for improving the alignment of the spine, reducing tension in the lower back, and calming the nervous system.
How to Perform Crocodile Pose
- Lie on Your Stomach: Begin by lying down on your stomach on the ground. Make sure your legs are slightly apart.
- Relax in Makarasana: Place your forehead on your palms and relax your entire body. This is the foundational position of Makarasana.
- Bring Your Legs Together: From the relaxed posture of Makarasana, move both your legs together, keeping them straight and aligned.
- Stretch Your Arms Forward: Extend your arms forward in front of you, keeping them straight. Rest your forehead on the ground.
- Raise Your Elbows: Next, lift your elbows and bring your hands near your chest while keeping your forehead on the ground.
- Lift Your Chin: Take a long, deep breath and slowly lift your chin, keeping your hands near your chest. This opens up your chest and stretches the spine.
- Return to Relaxation: Place your chin on your palms, allowing your body to relax. Keep your legs stretched in a way that avoids excessive tension in your waist.
- Bend and Move Your Leg: Bend one leg at the knee, moving it upwards. Hold this position for 15 to 30 seconds.
- Repeat and Breathe: Repeat the movements with the other leg, maintaining steady, deep breaths throughout the process.
Doing this pose daily provides great relief from back pain and promotes spinal health.
Benefits of Crocodile Pose
- Promotes Deep Relaxation: Makarasana helps to calm the mind and body, making it an excellent choice for stress relief.
- Improves Breathing: By encouraging diaphragmatic breathing, this pose enhances oxygen flow and lung capacity.
- Relieves Back Pain: The gentle positioning of the spine in this pose helps alleviate tension in the lower back and supports better spinal alignment.
- Reduces Fatigue: Makarasana is a rejuvenating pose that combats physical and mental fatigue.
- Enhances Meditation Practices: By fostering a state of relaxation, this pose prepares the mind for deeper meditation or pranayama.
Precautions
While Makarasana is a gentle and accessible pose for most people, consider the following precautions:
- Avoid this pose if you have a recent injury or surgery in the abdomen or spine.
- If you feel any discomfort in the neck, adjust the position of your arms and head.
- Pregnant individuals should consult their healthcare provider before attempting this pose.
Variations and Modifications
- For Neck Comfort: Use a folded blanket or cushion under your forehead if resting directly on your hands is uncomfortable.
- For Deeper Relaxation: Place a bolster or pillow under your chest to reduce strain on the lower back.
- Leg Variation: Bring your feet together and let your big toes touch if that feels more grounding for you.
Integrating Crocodile Pose into Your Practice
The beauty of Makarasana lies in its simplicity and versatility. Here are some ways to incorporate it into your routine:
- At the Start or End of Your Practice: Begin or conclude your yoga session with Makarasana to center your mind and body.
- As a Mid-Day Break: Take a few minutes during a hectic day to lie in this pose and reconnect with your breath.
- Before Pranayama or Meditation: Use Makarasana to calm your mind and prepare for focused breathing or meditative practices.
Conclusion
The Crocodile Pose is a reminder that sometimes the simplest practices can have the most profound effects. Whether you’re a seasoned yogi or new to the mat, Makarasana offers a space for rest, renewal, and reconnection. Embrace this pose as a part of your self-care routine, and let its tranquil energy guide you to a deeper sense of peace and well-being.
3.The Cobra Pose (Bhujangasana): Energize and Strengthen Your Body
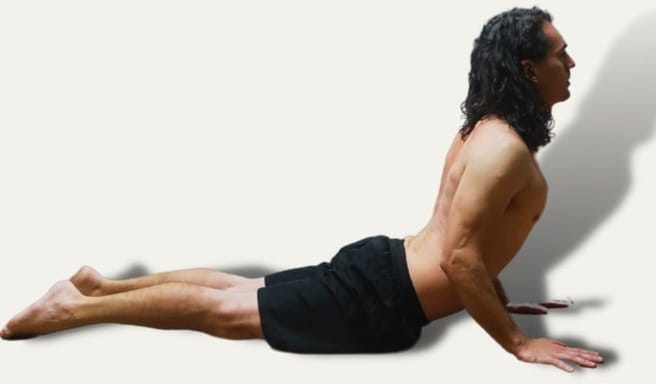
In the practice of yoga, certain poses hold the power to invigorate and rejuvenate the body while fostering mental clarity. One such dynamic posture is the Cobra Pose, or Bhujangasana. This back-bending asana is celebrated for its ability to strengthen the spine, open the chest, and boost overall vitality.
What is Cobra Pose?
The Cobra Pose gets its name from the graceful arch of a cobra’s hood as it lifts itself from the ground. Bhujangasana is a beginner-friendly yoga pose that is both energizing and therapeutic. It is often included in sequences like Surya Namaskar (Sun Salutation) and is known for its benefits to the spine and respiratory system.
How to Perform Cobra Pose
- Start with Preparation: Lie flat on your stomach on a yoga mat. Keep your legs together, with the tops of your feet resting on the floor.
- Position Your Hands: Place your palms flat on the mat beneath your shoulders, keeping your elbows close to your body.
- Engage Your Core: Gently press your pubic bone into the floor and activate your abdominal muscles to support your lower back.
- Lift Your Chest: Inhale deeply and slowly lift your head, chest, and upper abdomen off the floor. Use the strength of your back rather than pushing up with your hands.
- Adjust Your Arms: Straighten your arms slightly while keeping a micro-bend in the elbows. Ensure your shoulders are relaxed and away from your ears.
- Hold the Pose: Keep your gaze forward or slightly upward. Hold the pose for 15 to 30 seconds, breathing deeply.
- Release Gently: Exhale as you slowly lower your chest and head back to the mat. Relax completely before repeating.
Benefits of Cobra Pose
- Strengthens the Spine: Bhujangasana promotes spinal flexibility and strength, helping to alleviate back pain.
- Opens the Chest and Lungs: The pose enhances lung capacity and improves breathing, making it beneficial for those with respiratory issues.
- Stimulates Abdominal Organs: The gentle pressure on the abdomen can aid in digestion and improve the function of internal organs.
- Boosts Energy Levels: Cobra Pose is invigorating and helps combat fatigue and stress.
- Improves Posture: Regular practice can correct slouched shoulders and promote better posture.
Precautions
While Cobra Pose is generally safe, consider the following precautions:
- Avoid this pose if you have a recent abdominal surgery, hernia, or severe back injury.
- Do not overextend your lower back; listen to your body and keep movements gentle.
- Pregnant individuals should avoid this pose or practice it under the guidance of an experienced instructor.
Variations and Modifications
- Baby Cobra Pose: For a gentler version, lift only your head and chest without straightening your arms.
- Supported Cobra Pose: Place a rolled towel under your thighs or chest for additional support.
- Advanced Cobra Pose: For a deeper stretch, walk your hands slightly forward and lift higher, ensuring no strain on your lower back.
Integrating Cobra Pose into Your Practice
The Cobra Pose is a versatile asana that can be incorporated into various yoga routines:
- Morning Energizer: Include Bhujangasana in your morning practice to awaken the body and mind.
- Part of Sun Salutations: Practice it as a key component of Surya Namaskar to build strength and flexibility.
- Counterpose for Forward Bends: Use Cobra Pose to balance out deep forward folds and stretch the front body.
Conclusion
The Cobra Pose is a testament to the power of yoga in harmonizing the body and mind. Whether you’re seeking to strengthen your spine, open your heart, or simply boost your energy, Bhujangasana is a valuable addition to your practice. Embrace the vitality and confidence this pose brings, and let it inspire you on your journey to holistic well-being.
4.The Monkey Pose (Markatasana): A Gentle Twist for Relaxation
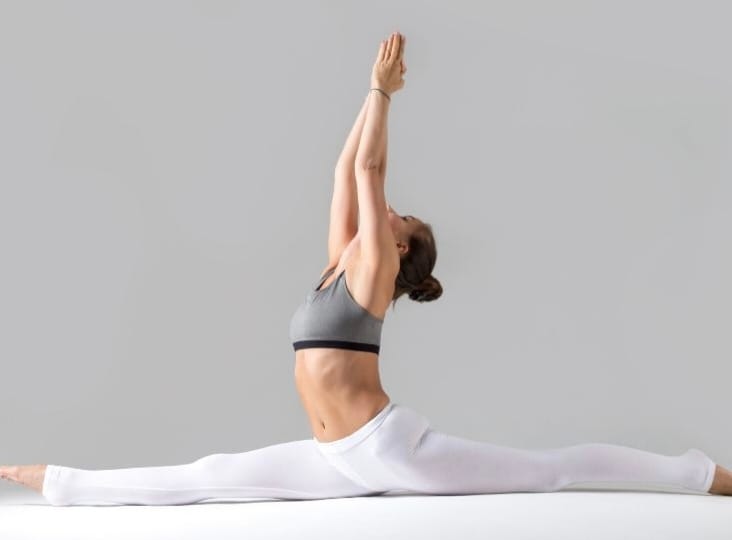
Yoga is a practice that not only strengthens the body but also soothes the mind. Markatasana, or the Monkey Pose, is a simple yet effective reclining twist that offers deep relaxation and spinal flexibility. This pose mimics the playful and agile nature of a monkey, encouraging a lighthearted and stress-free approach to life.
What is Markatasana?
Markatasana, also known as the Monkey Pose, is a reclining spinal twist that helps release tension in the back, improve digestion, and promote relaxation. It is a beginner-friendly pose that can be practiced by individuals of all ages and fitness levels. This asana is especially beneficial for those experiencing stiffness in the spine or stress-related discomfort.
How to Perform Markatasana
- Start by Lying Down: Lie flat on your back on a yoga mat. Keep your arms stretched out to the sides at shoulder level, forming a “T” shape.
- Bend Your Knees: Bring your knees up and place your feet flat on the floor. Ensure your lower back is relaxed.
- Drop Your Knees to One Side: Exhale and gently drop both knees to the right side. Allow your lower body to twist while keeping your shoulders firmly grounded.
- Turn Your Head: Look to the left to deepen the twist, creating a gentle spinal rotation.
- Relax in the Pose: Hold this position for 15 to 30 seconds, breathing deeply and evenly.
- Switch Sides: Inhale and bring your knees back to the center. Exhale and repeat the twist on the left side, turning your head to the right.
- Return to Center: After completing both sides, straighten your legs and relax in Savasana (Corpse Pose).
Benefits of Markatasana
- Releases Spinal Tension: The gentle twist helps alleviate stiffness and tension in the spine.
- Improves Digestion: The twisting motion massages the abdominal organs, promoting better digestion and detoxification.
- Relieves Stress: Markatasana calms the nervous system and helps reduce stress and anxiety.
- Enhances Flexibility: Regular practice improves spinal flexibility and mobility.
- Promotes Relaxation: The pose is deeply relaxing, making it ideal for unwinding after a long day.
Precautions
While Markatasana is generally safe, keep the following precautions in mind:
- Avoid this pose if you have severe spinal injuries or recent abdominal surgery.
- Practice gently if you have lower back pain or herniated discs.
- Consult a yoga instructor or healthcare professional if you are pregnant or have specific health concerns.
Variations and Modifications
- Supported Twist: Place a cushion or bolster under your knees for added support and comfort.
- Single-Leg Twist: Instead of twisting both legs, keep one leg straight and twist only the other leg.
- Arm Position: If stretching your arms out is uncomfortable, keep them by your sides or rest them on your belly.
Integrating Markatasana into Your Practice
Markatasana can be a valuable addition to your yoga routine. Here’s how to include it:
- As a Cool-Down Pose: Practice Markatasana at the end of your yoga session to relax and stretch the spine.
- Morning or Evening Routine: Include this pose in your daily routine to ease stiffness and start or end your day on a calm note.
- Complementary Pose: Use Markatasana as a counterpose to deep backbends or forward folds.
Conclusion
The Monkey Pose, or Markatasana, is a gentle and restorative yoga asana that brings ease to the body and peace to the mind. Its simple yet profound benefits make it a favorite among practitioners seeking relaxation and spinal health. Whether you’re new to yoga or looking to enhance your practice, Markatasana is a pose worth exploring. Embrace the playful essence of this pose and let it guide you toward greater flexibility, relaxation, and joy.
5.The Bow Pose (Dhanurasana): A Dynamic Backbend for Vitality
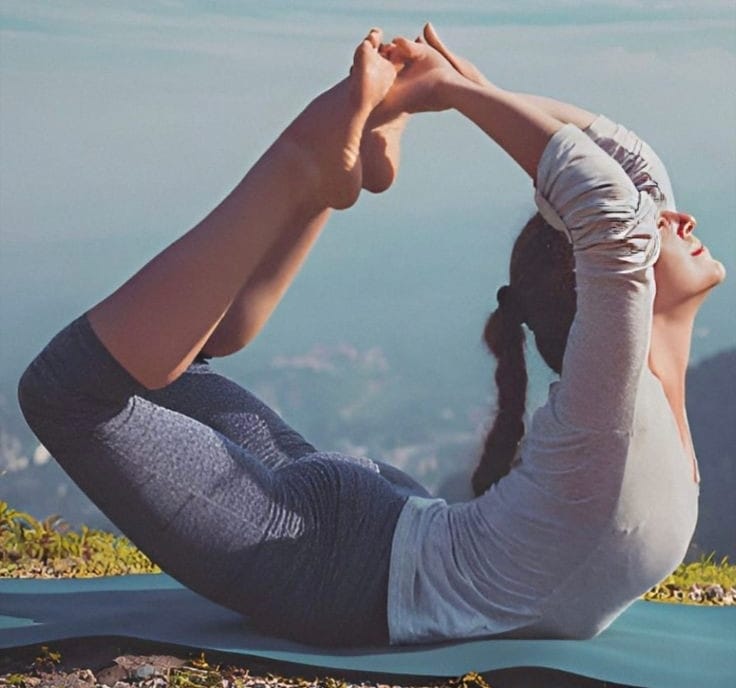
Yoga offers a range of postures to enhance flexibility, strength, and overall well-being. One of the most invigorating poses is the Bow Pose, or Dhanurasana, a dynamic backbend that stretches the entire front body while strengthening the back. This pose resembles an archer’s bow, with the torso and legs forming the curved shape and the arms acting as the string.
What is Dhanurasana?
Dhanurasana, also known as the Bow Pose, is an intermediate-level backbend that opens the chest, strengthens the back, and stimulates the abdominal organs. It is an excellent pose for improving posture, boosting energy levels, and promoting flexibility in the spine.
How to Perform Dhanurasana
- Start by Lying Down: Lie flat on your stomach on a yoga mat. Keep your arms by your sides and your legs extended straight.
- Bend Your Knees: Bend both knees and bring your heels close to your buttocks.
- Grab Your Ankles: Reach back with your hands and hold onto your ankles firmly. Ensure your grip is secure but not overly tight.
- Lift Your Chest and Thighs: Inhale deeply and lift your chest and thighs off the ground, creating a bow shape with your body. Keep your neck neutral and gaze forward.
- Balance on Your Abdomen: As you lift, balance your weight on your abdomen and pelvis. Avoid putting pressure on your lower ribs.
- Breathe Deeply: Hold the pose for 15 to 30 seconds, breathing steadily. Focus on expanding your chest and keeping your body relaxed.
- Release Gently: Exhale and slowly lower your chest and thighs back to the ground. Release your ankles and relax in a prone position.
Benefits of Dhanurasana
- Strengthens the Back: The pose engages and strengthens the muscles of the back, improving posture and spinal health.
- Opens the Chest: By stretching the chest and shoulders, Dhanurasana enhances lung capacity and promotes deeper breathing.
- Stimulates Digestion: The abdominal stretch massages internal organs, aiding in digestion and detoxification.
- Boosts Energy: This invigorating backbend revitalizes the body and mind, reducing fatigue and lethargy.
- Improves Flexibility: Regular practice increases flexibility in the spine, hips, and shoulders.
Precautions
While Dhanurasana is highly beneficial, it’s important to practice with care:
- Avoid this pose if you have severe back pain, neck injuries, or recent abdominal surgery.
- Pregnant individuals should not attempt this pose.
- Warm up adequately before practicing to prevent strain.
- Listen to your body and avoid pushing yourself into discomfort.
Variations and Modifications
- Half Bow Pose: If holding both ankles is challenging, perform the pose with one leg at a time.
- Use a Strap: Wrap a yoga strap around your ankles to make reaching them easier.
- Supported Bow Pose: Place a folded blanket under your pelvis for added comfort and support.
Integrating Dhanurasana into Your Practice
Dhanurasana can be a rewarding addition to your yoga routine. Here’s how to include it:
- As a Heart Opener: Practice this pose as part of a heart-opening sequence to release tension and cultivate emotional resilience.
- After Warm-Ups: Perform Dhanurasana after warming up with poses like Cobra Pose or Cat-Cow stretches.
- Counterpose for Forward Folds: Use Dhanurasana as a counterpose to deep forward bends, balancing the spine’s movements.
Conclusion
The Bow Pose, or Dhanurasana, is a powerful yoga asana that combines strength, flexibility, and energy. Its ability to open the heart, stretch the body, and invigorate the mind makes it a favorite among yoga practitioners. Whether you’re looking to improve your posture, boost your energy, or deepen your practice, Dhanurasana offers a pathway to vitality and balance. Embrace this dynamic pose and experience its transformative benefits firsthand.
Relieve Back Pain with Yoga: A Beginner’s Guide
Are you new to yoga and struggling with back pain? This beginner’s guide is here to help! Yoga is a gentle yet powerful way to reduce back pain, improve posture, and increase flexibility. In this guide, you’ll learn simple, beginner-friendly poses that target tension and stiffness in your back, while strengthening the muscles that support your spine. No prior experience is needed—just a willingness to embrace natural healing and self-care. Start your journey toward a stronger, pain-free back today with these easy-to-follow yoga tips and poses tailored for beginners!
The Best Yoga Poses to Soothe and Strengthen Your Back
A healthy back is key to living a pain-free, active life. Whether you’re dealing with back pain or looking to prevent it, these yoga poses are designed to both soothe discomfort and build strength. By combining gentle stretches with targeted strengthening exercises, these poses help release tight muscles, improve spinal alignment, and enhance flexibility. Perfect for all fitness levels, these yoga poses will leave your back feeling stronger, more mobile, and relaxed. Start incorporating these movements into your routine and experience the benefits of a balanced, pain-free back!
Some Important Questions for Back pain
1. Why Yoga Works Wonders for Back Pain Relief
Yoga is more than just a workout—it’s a holistic approach to healing and strengthening your body. When it comes to back pain, yoga is uniquely effective because it addresses both the physical and mental causes of discomfort. Through gentle stretches, yoga releases tension in tight muscles and improves flexibility, while strengthening exercises build core and spinal support. Beyond the physical, yoga also reduces stress, which is often a hidden contributor to back pain. Whether you’re dealing with chronic pain or stiffness, yoga offers a natural, low-impact solution that targets the root causes and promotes long-term relief. Discover why yoga is trusted by millions as a powerful tool for back pain recovery!
2. Common Causes of Back Pain (And How Yoga Can Help)
Back pain is one of the most common complaints, affecting people of all ages and lifestyles. Poor posture, sedentary habits, muscle imbalances, stress, and even improper lifting techniques are just a few of the culprits behind this discomfort. Over time, these factors can lead to tension, stiffness, and even chronic pain. The good news? Yoga offers a natural and effective solution. By addressing the root causes of back pain, yoga helps improve posture, release tight muscles, increase flexibility, and strengthen the core and back. With regular practice, yoga not only relieves existing pain but also prevents future discomfort, giving you a healthier, more resilient back.
3. Transform Your Daily Routine with Yoga for Back Health
Your daily habits play a crucial role in your back’s health, and yoga can be the game-changer you need. By incorporating simple yoga practices into your daily routine, you can alleviate back pain, improve posture, and boost flexibility—all while strengthening the muscles that support your spine. Whether it’s a quick morning stretch or a relaxing evening flow, yoga helps counteract the effects of long hours of sitting, poor posture, and stress. With just a few minutes a day, you can transform your back health, reduce discomfort, and feel stronger and more energized throughout your day. Start your journey to a pain-free, healthier back today!
4. Can yoga help with chronic back pain?
Yes, yoga can be a highly effective tool for managing and relieving chronic back pain. Through a combination of gentle stretches, strengthening exercises, and mindful movements, yoga addresses the root causes of back pain, such as muscle imbalances, poor posture, and tension. Regular practice helps improve flexibility, strengthen the muscles that support the spine, and increase overall mobility, which can reduce pain and prevent further injury.
Yoga also promotes relaxation, helping to alleviate stress, which is often a contributing factor to chronic pain. It encourages better posture and alignment, which can reduce strain on the back and prevent future discomfort. While yoga might not provide instant relief, consistent practice over time can significantly improve back health and reduce the intensity of chronic pain.
For chronic pain sufferers, it’s important to start with gentle, beginner-friendly poses and, if necessary, consult with a healthcare provider or yoga instructor to ensure proper technique and avoid strain.
5. How does yoga improve back health?
Yoga improves back health by addressing both the physical and mental factors that contribute to discomfort and pain. Here’s how it works:
- Increases Flexibility: Yoga helps stretch tight muscles in the back, hips, and legs, which can alleviate tension and improve range of motion. Increased flexibility in the spine and surrounding muscles reduces strain and pressure on the back.
- Strengthens Core Muscles: A strong core is essential for supporting the spine and maintaining good posture. Yoga poses target the muscles of the abdomen, back, and pelvis, helping to stabilize and protect the spine from injury or strain.
- Improves Posture: Many yoga poses emphasize spinal alignment and body awareness, which helps improve posture. By practicing yoga regularly, you can reduce the risk of slouching or poor alignment that often contributes to back pain.
- Reduces Muscle Tension: Yoga encourages deep breathing and relaxation, which helps release tension from the muscles. By gently stretching and relaxing the muscles of the back, yoga can alleviate chronic muscle tightness that often causes pain.
- Promotes Spinal Health: Certain yoga poses are designed to gently elongate the spine and improve its natural curvature. This promotes better spinal alignment, which can relieve pressure on discs, nerves, and joints, reducing back pain.
- Enhances Circulation: The physical movements and stretches in yoga increase blood flow to the muscles, ligaments, and joints of the back, promoting healing and reducing inflammation.
- Encourages Mind-Body Connection: Yoga isn’t just about physical movement; it also encourages mindfulness and self-awareness. This can help individuals become more attuned to their bodies, notice early signs of discomfort, and address them before they lead to pain.
By incorporating yoga into your daily routine, you can strengthen and stretch key muscles, improve posture, and reduce the risk of injury, all of which contribute to better long-term back health.
6. How often should beginners practice yoga for back pain relief?
For beginners, practicing yoga for back pain relief 2-3 times per week is a great starting point. This frequency allows your body to gradually adjust to the movements and build strength and flexibility without overstraining muscles or joints. As you become more comfortable with the poses and your body starts to feel more aligned and strengthened, you can gradually increase the frequency to 4-5 times per week, depending on your needs and schedule. However, it’s important to listen to your body and avoid pushing yourself too hard, especially in the early stages of practicing yoga for back pain.
Here are some general guidelines to follow:
- Start Slow: Begin with short sessions (15-30 minutes) to avoid overloading your muscles and joints. You can gradually lengthen your practice as you build endurance and confidence.
- Consistency is Key: While the frequency of practice is important, the consistency of your practice is even more crucial. Regular practice, even if it’s just a few times a week, is more beneficial than sporadic, intense sessions.
- Rest Days Are Important: Make sure to incorporate rest days into your routine. Your body needs time to recover, especially if you’re working on strengthening muscles or stretching tight areas. On rest days, gentle stretches or relaxation practices can be helpful.
- Focus on Quality, Not Quantity: Especially for beginners, it’s better to focus on performing the poses correctly and with proper alignment than to practice for long periods. Good form ensures that you’re benefiting from the stretches and exercises without risking injury.
- Daily Maintenance: If possible, you can do gentle stretches or breathing exercises daily, even if just for a few minutes. These can help with relaxation, pain relief, and muscle recovery between your main yoga sessions.
Remember, every body is different, so it’s important to monitor how your body feels and adjust your routine accordingly. If at any point you feel pain (rather than mild discomfort or stretching sensation), it’s important to back off and consult a yoga instructor or healthcare professional.
7. Do I need any special equipment for yoga for back pain?
No, you don’t need much special equipment to practice yoga for back pain. Yoga is often practiced with minimal gear, and many beginner-friendly poses can be done with just a few essentials. However, here are a few items that can make your practice more comfortable and effective:
- Yoga Mat: A non-slip yoga mat is the most important item. It provides cushioning and stability, helping to prevent slipping during poses. It also adds support, especially when practicing on hard floors.
- Blocks: Yoga blocks are helpful for providing extra support in certain poses, especially if you have limited flexibility. They can help you modify poses, making them more accessible and comfortable for your back.
- Straps: A yoga strap can be used to deepen stretches and improve flexibility. It’s particularly useful in poses that require reaching your legs or arms, helping you avoid overstretching or straining your back.
- Cushions or Pillows: For added comfort, especially in restorative poses, cushions or pillows can provide support under your knees, head, or lower back. This is especially beneficial if you have sensitive areas or need extra cushioning during relaxation poses.
- Bolsters: A bolster is a larger cushion that can support the back in restorative poses, helping to open up the chest or provide gentle support for the lower back during relaxation.
While these items are helpful, they are not strictly necessary. Many people practice yoga with just a mat or even on a soft carpet. The most important factor is being mindful of your body, starting slowly, and modifying poses as needed to suit your comfort level and avoid strain.
8. What should beginners avoid when practicing yoga for back pain?
While yoga can be a great way to relieve back pain, beginners should take certain precautions to ensure they’re practicing safely and effectively. Here’s what to avoid when practicing yoga for back pain:
1. Overstretching or Pushing Too Hard
- Why to Avoid: Overstretching can strain muscles, ligaments, and joints, potentially worsening back pain.
- What to Do Instead: Focus on gradual, gentle stretches. Never force your body into a position that feels painful. Stretch to a point where you feel a mild sensation of tension, but not pain.
2. Skipping Warm-ups
- Why to Avoid: Jumping straight into yoga poses without warming up can increase the risk of injury.
- What to Do Instead: Always start with gentle movements or stretches to prepare your body. A warm-up helps to increase blood flow to your muscles and joints, making them more flexible and less prone to injury.
3. Ignoring Proper Alignment
- Why to Avoid: Poor alignment can put unnecessary strain on your back and exacerbate pain.
- What to Do Instead: Pay close attention to your form. Consider working with a certified yoga instructor if possible, especially in the beginning, to learn the correct alignment for each pose. Use props like blocks and straps for support as needed.
4. Doing High-Impact or Intense Poses
- Why to Avoid: Intense or high-impact poses (like deep backbends or fast-paced flows) may aggravate your back pain or cause injury.
- What to Do Instead: Stick to gentle, restorative poses and slow, controlled movements. Focus on poses that stretch and strengthen your back without straining it.
5. Holding Poses for Too Long
- Why to Avoid: Holding a challenging pose for too long can cause fatigue and strain, especially for beginners.
- What to Do Instead: Start by holding each pose for a shorter amount of time (10-30 seconds), and gradually increase as your strength and flexibility improve. Listen to your body, and if you feel discomfort, come out of the pose gently.
6. Neglecting Breath Awareness
- Why to Avoid: Shallow breathing or holding your breath can increase tension in the body, especially in the back.
- What to Do Instead: Focus on deep, steady breaths throughout your practice. Breathing deeply and mindfully helps to relax the muscles and improve oxygen flow to the back muscles, aiding in pain relief and healing.
7. Ignoring Pain Signals
- Why to Avoid: Pushing through pain can worsen back issues and lead to injury.
- What to Do Instead: Always listen to your body. If something feels painful or uncomfortable, stop immediately and modify the pose or rest. There’s a difference between stretching discomfort (which is normal) and pain (which signals injury).
8. Not Modifying Poses
- Why to Avoid: Many standard yoga poses can be difficult or uncomfortable for beginners with back pain.
- What to Do Instead: Use modifications or props (like blocks, bolsters, and straps) to make poses more accessible. Many poses can be adjusted to suit your flexibility level and back condition.
9. Skipping Rest and Recovery
- Why to Avoid: Practicing yoga every day without proper rest can lead to fatigue and overuse injuries, especially in the back.
- What to Do Instead: Allow your body to recover by taking rest days and practicing mindfulness or gentle stretches between more intense sessions. Incorporate relaxation poses like Child’s Pose or Savasana to help your muscles relax and recover.
10. Forgetting to Seek Professional Guidance
- Why to Avoid: Without proper instruction, you might not be performing poses correctly, which could lead to further injury.
- What to Do Instead: If possible, work with a certified yoga instructor who can guide you through poses and ensure proper alignment, especially when dealing with back pain. Additionally, consulting a healthcare professional before starting yoga can help ensure that your practice is safe and suitable for your condition.
By avoiding these common pitfalls, beginners can practice yoga safely and effectively for back pain relief, gradually improving their strength, flexibility, and overall back health.
Specific Pain Areas:
1. Which yoga poses are best for lower back pain?
Yoga can be an excellent way to alleviate lower back pain and improve flexibility, strength, and posture. Here are some of the best yoga poses for lower back pain:
1. Cat-Cow Pose (Marjaryasana-Bitilasana)
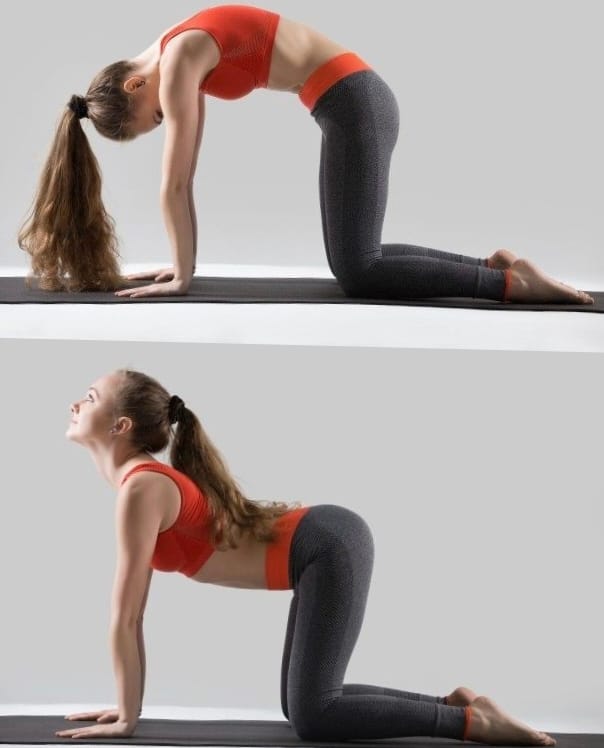
- Why it’s helpful: This pose stretches and strengthens the spine, promoting mobility and relieving tension in the lower back.
- How to do it:
- Start on your hands and knees in a tabletop position.
- Inhale as you arch your back, lifting your head and tailbone (Cow Pose).
- Exhale as you round your spine, tucking your chin and pelvis (Cat Pose).
- Repeat 5–10 times.
2. Child’s Pose (Balasana)
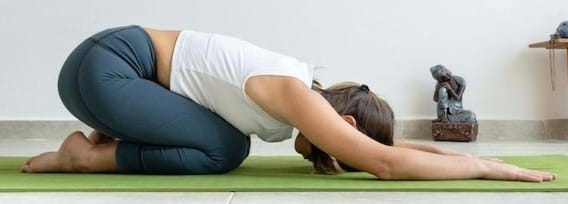
- Why it’s helpful: It gently stretches the lower back, hips, and thighs, providing relief from tension.
- How to do it:
- Start in a kneeling position.
- Sit back on your heels, stretch your arms forward, and rest your forehead on the mat.
- Hold for 30 seconds to 1 minute while breathing deeply.
3. Sphinx Pose
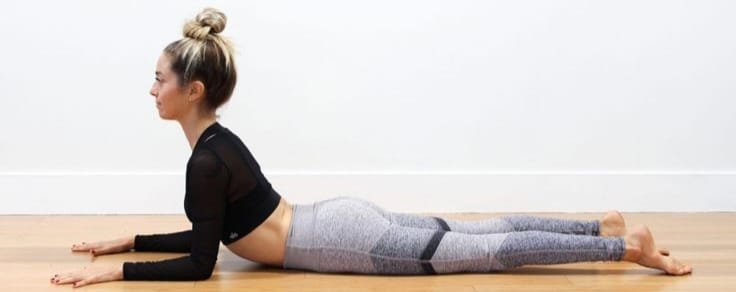
- Why it’s helpful: Strengthens the lower back and stretches the abdominal muscles, reducing stiffness.
- How to do it:
- Lie on your stomach with your forearms on the mat, elbows under your shoulders.
- Press into your forearms and lift your chest, keeping your lower back relaxed.
- Hold for 20–30 seconds, then release.
4. Downward-Facing Dog (Adho Mukha Svanasana)
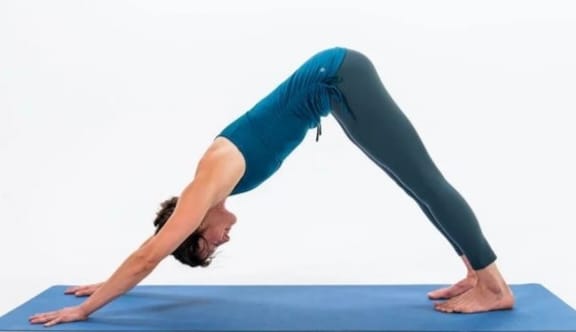
- Why it’s helpful: Stretches the spine, hamstrings, and calves, which can reduce tension in the lower back.
- How to do it:
- Start on your hands and knees.
- Lift your hips toward the ceiling, creating an inverted “V” shape.
- Keep your knees slightly bent if needed and press your hands firmly into the mat.
- Hold for 30 seconds to 1 minute.
5. Supine Twist (Supta Matsyendrasana)
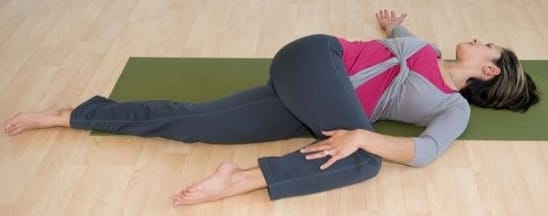
- Why it’s helpful: Relieves tension in the lower back and improves spinal mobility.
- How to do it:
- Lie on your back with your legs extended.
- Draw one knee into your chest, then cross it over your body to the opposite side.
- Extend your arms out in a “T” shape and turn your head in the opposite direction.
- Hold for 30 seconds to 1 minute on each side
Tips for Practicing:
Consult a healthcare provider or yoga therapist if you have severe or chronic back pain before beginning a yoga practice.
Move slowly and avoid forcing any pose that causes pain.
Use props like yoga blocks, straps, or cushions for added support.
Focus on deep, even breathing to enhance relaxation and reduce tension.
for any of these poses?
2. What yoga exercises can help with upper back pain?
Upper back pain can often result from poor posture, muscle tension, or stress. Yoga can help alleviate discomfort by increasing flexibility, improving posture, and strengthening the muscles in the upper back. Here are some yoga exercises that can be especially beneficial for upper back pain:
1. Seated Cat-Cow Stretch (Seated Marjaryasana-Bitilasana)
- Why it’s helpful: This variation of the Cat-Cow pose stretches the spine and helps relieve tension in the upper back and neck.
- How to do it:
- Sit comfortably on the floor or on a chair with your spine straight.
- Inhale, arch your back, and open your chest, lifting your head and tailbone (Cow Pose).
- Exhale, round your spine, tuck your chin, and pull your belly button toward your spine (Cat Pose).
- Repeat 5–10 times, moving with your breath.
2. Thread the Needle Pose

- Why it’s helpful: This pose targets the upper back and shoulders, helping to release tension.
- How to do it:
- Start in a tabletop position (hands and knees).
- Slide your right arm under your left arm, bringing your right shoulder and cheek to the mat.
- Keep your left elbow bent and your left hand pressing into the floor for support.
- Hold for 30 seconds to 1 minute on each side.
3. Child’s Pose with Extended Arms (Balasana)
- Why it’s helpful: A gentle stretch for the upper back, shoulders, and neck.
- How to do it:
- Start in a kneeling position.
- Sit back on your heels and reach your arms forward, lowering your forehead to the floor.
- Keep your hips grounded and breathe deeply, feeling the stretch in your upper back.
- Hold for 1–2 minutes.
4. Reverse Tabletop Pose (Ardha Purvottanasana)

- Why it’s helpful: This pose opens up the chest, shoulders, and upper back while strengthening the arms and upper body.
- How to do it:
- Sit on the floor with your legs bent and feet flat on the floor, hands placed behind you with fingers pointing toward your feet.
- Press your feet into the floor and lift your hips toward the ceiling, coming into a reverse table position.
- Keep your chest lifted and shoulders away from your ears.
- Hold for 20–30 seconds, then slowly lower back down.
5. Shoulder Bridge Pose (Setu Bandhasana)
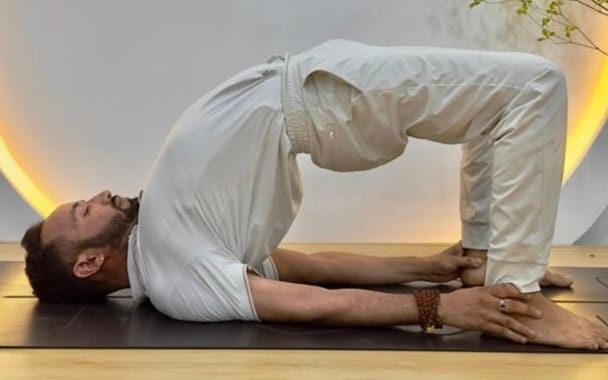
- Why it’s helpful: This pose helps release tightness in the upper back, shoulders, and neck, while strengthening the lower body.
- How to do it:
- Lie on your back with your knees bent and feet flat on the floor.
- Press your feet into the floor and lift your hips toward the ceiling, creating a straight line from your shoulders to your knees.
- Interlace your hands under your back and press your arms into the mat to open your chest.
- Hold for 20–30 seconds, then gently lower back down.
Tips for Practice:
- Move slowly and gently into each pose, being mindful of any discomfort in your upper back.
- Use props, such as blocks or cushions, to support your body and make the stretches more accessible.
- Focus on deep, slow breathing to help relax the muscles in your upper back.
- If you have chronic pain or an injury, consider consulting with a healthcare provider or yoga therapist before practicing.
Conclusion:
Yoga offers a powerful and holistic approach to relieving back pain. By combining stretching, strengthening, alignment, and mindfulness, yoga addresses not only the physical causes of discomfort but also the mental and emotional factors that contribute to tension and stress in the body.
Key Takeaways:
- Improved Flexibility and Strength: Through simple yoga poses, you can increase flexibility in the muscles and joints surrounding the spine while strengthening the muscles that support the back, helping to prevent future pain.
- Better Posture and Alignment: Yoga emphasizes the importance of proper body alignment, which can correct postural issues that lead to chronic back pain. It fosters awareness of how you hold your body throughout the day.
- Stress Relief and Relaxation: The breathing techniques and mindfulness integrated into yoga practice can reduce stress, which is often a contributor to muscle tension and back pain.
- Customizable to Your Needs: Yoga offers a variety of poses and variations, making it easy to adapt to your specific needs, whether you are dealing with lower back pain, upper back discomfort, or tight muscles.
- Long-Term Benefits: Consistent practice of yoga can not only alleviate existing back pain but also help you build a strong foundation for a pain-free, active lifestyle.
For lasting relief, integrating yoga into your daily routine can significantly reduce discomfort, improve mobility, and help you maintain a healthy, well-aligned spine. Whether you’re dealing with acute pain or chronic discomfort, yoga provides a natural, sustainable solution that can transform your back health over time.
If you’re new to yoga or have specific back pain concerns, starting with gentle poses and seeking guidance from a qualified yoga instructor or healthcare provider can ensure you practice safely and effectively.
RELATED POSTS
View all
