Unlock Better Digestion with These Powerful Yoga Poses: A Natural Solution for Stomach Issues 2025
January 5, 2025 | by paruli6722@gmail.com

Unlock better digestion with yoga! Relieve bloating, acidity, and constipation while restoring balance and promoting a healthier digestive system naturally.
Say Goodbye to Stomach Issues: How Yoga Can Unlock Better Digestion Health Naturally
Are you tired of dealing with constant stomach issues? Whether it’s bloating, indigestion, or constipation, your digestive health plays a key role in your overall well-being. While medication can offer temporary relief, yoga provides a natural, long-term solution to unlock better digestion and promote gut health. Incorporating specific yoga poses into your daily routine can stimulate your digestive system, reduce stress, and enhance your overall quality of life. Let’s dive into the most effective yoga poses for better digestion.
How Yoga Unlock Better Digestion?
Yoga works on both the physical and mental aspects of digestion. Physically, certain poses massage the abdominal organs, improve blood circulation, and encourage the movement of food and waste through the digestive tract. Mentally, yoga reduces stress, which is a major contributor to digestive issues. By calming the mind and body, yoga creates an environment where the digestive system can function optimally.
Discover the Better Digestive Power of Yoga: Simple Poses for a Healthier Gut
Yoga is more than just a fitness trend—it’s a powerful tool to nurture your digestive system. By incorporating targeted yoga poses into your daily routine, you can stimulate the digestive organs, reduce bloating, and relieve constipation naturally, unlock better digestion. These poses work by gently massaging the abdominal area, enhancing blood flow to the gut, and calming the nervous system. The result? A healthier, happier gut and improved overall well-being. Whether you’re looking for relief from chronic stomach issues or want to maintain a balanced digestive system, yoga offers simple, effective solutions you can start today.
Best Yoga Poses For Unlock Better Digestion?
Digestive issues such as bloating, gas, and indigestion are often linked to stress, poor posture, and a lack of physical activity. Yoga offers a natural and holistic way to unlock better digestion by gently stimulating the digestive organs, reducing stress, and improving blood flow to the abdomen. Here are the top yoga poses to boost digestion and gut health:
1. Seated Forward Bend (Paschimottanasana)
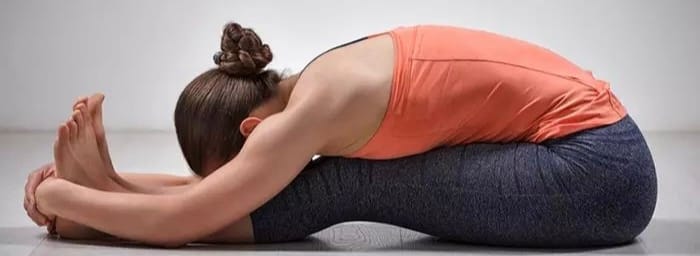
Seated Forward Bend, known as Paschimottanasana in Sanskrit, is a foundational yoga posture that offers a wealth of physical, mental, and spiritual benefits. “Paschima” translates to “west,” referring to the back side of the body, and “uttana” means “stretch.” This asana is particularly effective for stretching the entire posterior chain of the body, from the heels to the crown of the head.
How to Perform Paschimottanasana
- Prepare the Space: Find a quiet, clean, and comfortable space to practice. Use a yoga mat for support.
- Sit in Dandasana (Staff Pose): Sit on the floor with your legs extended straight in front of you. Keep your spine erect, and place your hands on the floor beside your hips.
- Engage the Legs: Flex your feet, drawing your toes toward your face. Engage your thigh muscles to stabilize the legs.
- Inhale and Lengthen: Raise your arms overhead, elongating your spine as you inhale.
- Exhale and Fold Forward: Hinge at your hips (not your waist) and slowly lean forward, reaching for your feet or ankles. Keep your spine long and avoid rounding the back.
- Hold the Pose: Rest your hands wherever they comfortably reach—on your shins, ankles, or feet. If possible, grasp the sides of your feet and gently pull yourself deeper into the stretch. Hold the pose for 20-60 seconds, breathing deeply.
- Release: Inhale to come back up to a seated position, keeping your movements slow and controlled.
Benefits of Paschimottanasana
- Physical Benefits:
- Improves Flexibility: Stretches the hamstrings, calves, and lower back.
- Stimulates Digestion: Massages abdominal organs, aiding in digestion and relieving constipation, Unlock better digestion.
- Relieves Tension: Helps alleviate tightness in the spine and shoulders.
- Mental Benefits:
- Reduces Stress: Encourages a sense of calm and relaxation, making it an effective stress-relief posture.
- Enhances Focus: Promotes mindfulness and concentration through deep, steady breathing.
- Energetic Benefits:
- Balances Energy: Stimulates the Manipura (solar plexus) chakra, fostering inner strength and confidence.
- Encourages Introspection: The forward-folding motion naturally encourages a reflective and meditative state.
Modifications and Props
- Use a Strap: If reaching your feet is challenging, loop a yoga strap or towel around your soles and hold onto it while maintaining a straight spine.
- Elevate the Hips: Sit on a folded blanket or cushion to make the pose more accessible, especially if your hamstrings are tight.
- Bend the Knees: Slightly bend your knees to reduce strain on the lower back and hamstrings.
Precautions
- Avoid practicing Paschimottanasana if you have severe lower back injuries, herniated discs, or sciatica.
- Pregnant individuals should avoid deep forward folds and consult a qualified yoga instructor for modifications.
- Always listen to your body. Never force yourself into the pose if it causes pain or discomfort.
2. Cat-Cow Stretch (Marjaryasana-Bitilasana)
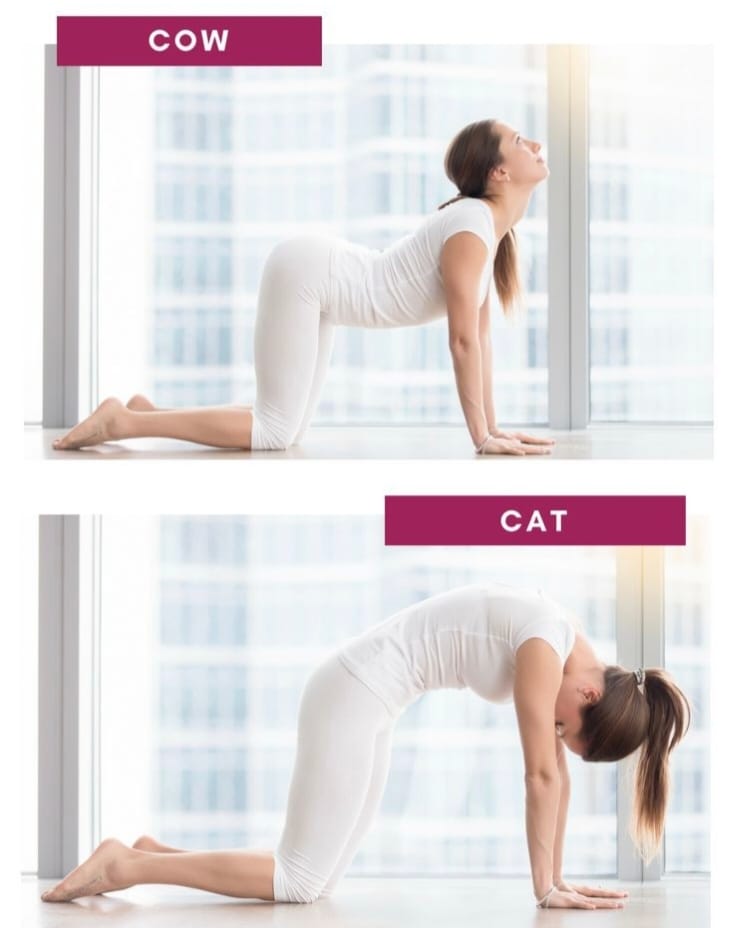
The Cat-Cow Stretch, known as Marjaryasana-Bitilasana in Sanskrit, is a dynamic and gentle yoga sequence that improves flexibility, promotes spinal health, and enhances overall well-being. This flowing movement between two poses—Marjaryasana (Cat Pose) and Bitilasana (Cow Pose)—is a staple in many yoga practices due to its simplicity and effectiveness.
How to Perform Cat-Cow Stretch
- Start in a Tabletop Position:
- Begin on your hands and knees, with your wrists aligned under your shoulders and your knees under your hips.
- Keep your back flat and your neck in a neutral position, gazing at the floor.
- Move into Cow Pose (Bitilasana):
- Inhale deeply as you drop your belly toward the mat.
- Lift your chest and head, gazing slightly upward.
- Roll your shoulders away from your ears, and tilt your pelvis upward, creating an arch in your lower back.
- Transition to Cat Pose (Marjaryasana):
- Exhale as you round your back toward the ceiling.
- Tuck your chin to your chest, drawing your belly button toward your spine.
- Press through your hands and knees to actively stretch your spine.
- Flow Between Poses:
- Continue to alternate between Cow Pose and Cat Pose, syncing your movements with your breath. Inhale for Cow Pose and exhale for Cat Pose.
- Repeat the sequence for 5-10 rounds or as long as it feels comfortable.
Benefits of Cat-Cow Stretch
- Physical Benefits:
- Improves Spinal Flexibility: Enhances the mobility of the spine by gently stretching and warming up the back muscles.
- Relieves Back Pain: Helps alleviate tension in the lower back and neck.
- Strengthens Core Muscles: Engages and strengthens the abdominal and back muscles.
- Mental Benefits:
- Reduces Stress: Encourages deep, mindful breathing, which promotes relaxation and reduces stress levels.
- Increases Body Awareness: Helps you connect with your body’s natural rhythm and movement.
- Energetic Benefits:
- Stimulates Chakras: Activates the root (Muladhara) and sacral (Svadhisthana) chakras, promoting stability and creativity.
- Enhances Energy Flow: Encourages the free flow of prana (life energy) along the spine.
Modifications and Tips
- Wrist Support: If your wrists feel strained, place a folded towel or blanket under your hands for extra cushioning.
- Neck Sensitivity: If looking upward in Cow Pose causes discomfort, keep your neck in a neutral position.
- Knee Comfort: Use a padded surface or place a folded blanket under your knees to prevent discomfort.
- Gentle Movement: Keep the movements slow and controlled, focusing on the synchronization of breath and motion.
Precautions
- Avoid this stretch if you have a recent wrist, knee, or back injury. Consult a healthcare professional or experienced yoga instructor before attempting.
- Pregnant individuals should practice with caution and may need to modify the poses to avoid excessive strain on the abdomen.
- Listen to your body. If any movement causes pain or discomfort, stop and adjust your practice.
3. Wind-Relieving Pose (Pawanmuktasana)

Wind-Relieving Pose, or Pawanmuktasana in Sanskrit, is a simple yet highly effective yoga posture designed to release trapped gas and improve digestion. The name comes from three Sanskrit words: “Pawan” meaning wind, “Mukta” meaning release, and “Asana” meaning pose. This pose not only aids in digestive health but also strengthens the lower back and enhances overall relaxation.
How to Perform Pawanmuktasana
- Start by Lying Down:
- Lie flat on your back on a yoga mat. Keep your legs extended and your arms resting by your sides.
- Ensure that your head, neck, and spine are aligned.
- Bend Your Right Knee:
- Inhale deeply, and as you exhale, draw your right knee toward your chest.
- Interlace your fingers around your shin, just below the knee, or use a yoga strap if needed.
- Engage the Pose:
- Press your right thigh gently into your abdomen.
- Keep your left leg extended and active, with the foot flexed.
- Lift Your Head and Shoulders (Optional):
- Inhale deeply, and as you exhale, lift your head and shoulders off the mat, bringing your nose toward your knee. This step is optional and can be skipped if it causes discomfort.
- Switch Sides:
- Hold the pose for 20-30 seconds while breathing deeply. Release and repeat the same steps with your left leg.
- Double-Leg Variation:
- For a deeper stretch, bend both knees and draw them toward your chest.
- Wrap your arms around your legs, holding your elbows or wrists if possible.
- Hold for 20-30 seconds, then release.
Benefits of Pawanmuktasana
- Physical Benefits:
- Aids Digestion: Stimulates the digestive organs, helping to relieve bloating, gas, and constipation, unlock better digestion.
- Strengthens the Lower Back: Improves flexibility and strengthens the lower back muscles.
- Relieves Tension: Stretches the hips and thighs, alleviating tension in these areas.
- Mental Benefits:
- Promotes Relaxation: Encourages deep breathing, which calms the mind and reduces stress.
- Enhances Focus: Improves body awareness and mindfulness.
- Energetic Benefits:
- Activates the Manipura Chakra: Stimulates the solar plexus chakra, which governs energy and vitality.
- Balances Energy Flow: Facilitates the smooth flow of prana (life energy) throughout the body.
Modifications and Tips
- Use a Strap: If reaching your shin is challenging, loop a yoga strap or towel around your knee and hold the ends.
- Support Your Neck: Place a folded blanket under your head if lifting it off the mat feels uncomfortable.
- Keep It Gentle: Avoid pressing the knee too firmly into the abdomen to prevent strain.
- Double-Leg Alternative: If bending one knee at a time feels too easy, try the double-leg variation for a more intense stretch.
Precautions
- Avoid practicing this pose if you have a recent abdominal surgery, hernia, or severe lower back issues.
- Pregnant individuals should skip this pose to avoid putting pressure on the abdomen.
- Always listen to your body and avoid forcing yourself into the pose if it causes discomfort.
4. Twisted Chair Pose (Parivrtta Utkatasana)

Twisted Chair Pose, or Parivrtta Utkatasana in Sanskrit, is a dynamic and energizing yoga posture that combines strength, balance, and detoxification. “Parivrtta” means “revolved” or “twisted,” and “Utkatasana” translates to “fierce pose” or “chair pose.” This posture not only builds stamina and stability but also stimulates the digestive system and enhances mental focus.
How to Perform Parivrtta Utkatasana
- Begin in Chair Pose (Utkatasana):
- Stand tall with your feet together, toes pointing forward.
- Inhale as you bend your knees and lower your hips as if sitting in an imaginary chair.
- Keep your weight evenly distributed between your heels and toes, and ensure your knees don’t extend past your toes.
- Extend your arms overhead, palms facing each other, and keep your spine straight.
- Bring Hands to Prayer Position:
- Exhale and bring your hands to your heart center in Anjali Mudra (prayer position).
- Keep your chest lifted and shoulders relaxed.
- Add the Twist:
- Inhale deeply, and as you exhale, twist your torso to the right, bringing your left elbow to the outside of your right thigh.
- Press your palms firmly together to deepen the twist and open your chest.
- Engage the Legs and Core:
- Keep your knees aligned and avoid letting one knee move forward of the other.
- Engage your core muscles to support the twist and maintain balance.
- Hold the Pose:
- Stay in the twisted position for 20-30 seconds while breathing deeply.
- Focus on elongating your spine with each inhale and deepening the twist with each exhale.
- Switch Sides:
- Inhale to return to the center in Chair Pose, and exhale to twist to the opposite side.
Benefits of Parivrtta Utkatasana
- Physical Benefits:
- Strengthens the Lower Body: Builds strength in the thighs, calves, and glutes.
- Tones the Core: Engages the abdominal muscles, promoting core stability.
- Improves Spinal Flexibility: Enhances the mobility of the spine through the twisting motion.
- Detoxifies the Body: Stimulates internal organs, aiding in digestion and detoxification.
- Mental Benefits:
- Enhances Focus: Requires concentration and mindfulness to maintain balance and alignment.
- Reduces Stress: Encourages deep breathing, which helps calm the mind and relieve tension.
- Energetic Benefits:
- Balances Chakras: Activates the Manipura (solar plexus) chakra, fostering confidence and inner power.
- Energizes the Body: Boosts circulation and revitalizes energy levels.
Modifications and Tips
- Use a Wall for Support: If balance is a challenge, practice with your back near a wall to stabilize yourself.
- Keep It Gentle: If the full twist is too intense, twist only partially or place your elbow on your thigh instead of the outside of the knee.
- Separate Your Feet: If keeping your feet together is uncomfortable, try separating them slightly to improve stability.
- Focus on Alignment: Ensure your knees stay aligned throughout the pose to avoid strain on the joints.
Precautions
- Avoid this pose if you have recent knee, hip, or spinal injuries.
- Pregnant individuals should avoid deep twists and consult a yoga instructor for safe modifications.
- Those with low blood pressure or balance issues should practice with caution.
- Listen to your body and come out of the pose if you feel pain or discomfort
5. Child’s Pose (Balasana)
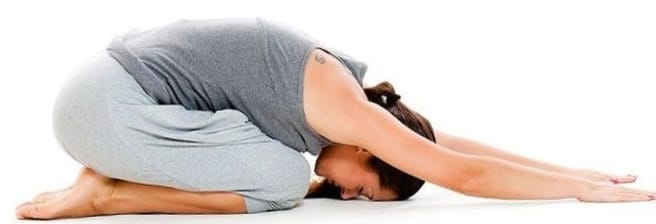
Child’s Pose, or Balasana in Sanskrit, is a deeply restorative yoga posture that promotes relaxation and rejuvenation. “Bala” means “child,” and “asana” means “pose.” This foundational posture embodies the qualities of a child—restful, grounded, and introspective—making it a cornerstone in yoga practices for practitioners of all levels. It is often used as a resting pose during sequences or as a standalone posture to ease tension and stress.
How to Perform Balasana
- Start in a Kneeling Position:
- Begin by kneeling on your yoga mat with your big toes touching and your knees either together or hip-width apart, depending on your comfort level.
- Lower Your Hips:
- Sit back onto your heels, letting your hips rest as close to them as possible. If this is uncomfortable, you can place a folded blanket or bolster between your thighs and calves for support.
- Extend Your Torso Forward:
- Inhale deeply, and as you exhale, hinge at your hips and lower your torso forward, resting it between or on top of your thighs.
- Position Your Arms:
- Stretch your arms forward with your palms facing down, or rest them alongside your body with your palms facing up.
- Relax Your Head:
- Rest your forehead gently on the mat. If your forehead doesn’t comfortably reach the floor, place a block, cushion, or folded blanket underneath for support.
- Breathe Deeply:
- Close your eyes and focus on deep, steady breathing. Allow your body to relax fully with each exhale.
- Hold the Pose:
- Stay in the pose for 30 seconds to several minutes, depending on your needs and comfort level.
Benefits of Balasana
- Physical Benefits:
- Releases Tension: Gently stretches the lower back, hips, thighs, and ankles.
- Relieves Pain: Alleviates tension in the spine, shoulders, and neck.
- Improves Flexibility: Gradually increases flexibility in the hips and thighs.
- Mental Benefits:
- Reduces Stress: Promotes relaxation by calming the mind and reducing anxiety.
- Encourages Mindfulness: Provides a quiet moment for introspection and connection with the breath.
- Energetic Benefits:
- Grounding: Activates the root chakra (Muladhara), fostering a sense of stability and security.
- Restorative: Replenishes energy and promotes balance in the body.
Modifications and Props
- Support the Hips: Use a bolster or folded blanket between your thighs and calves if sitting back fully is uncomfortable.
- Support the Head: Place a cushion or yoga block under your forehead to reduce strain on your neck.
- Widen the Knees: If your torso feels compressed, widen your knees to create more space.
- Arm Variations: Keep your arms extended forward, rest them alongside your body, or stack your hands under your forehead for added support.
Precautions
- Avoid this pose if you have severe knee injuries, recent surgery, or difficulty sitting on your heels.
- Pregnant individuals should practice with knees wide apart to make room for the belly.
- If you have high blood pressure or dizziness, keep your head elevated on a block or cushion.
- Always listen to your body and come out of the pose if it causes discomfort or pain.
6. Boat Pose (Navasana
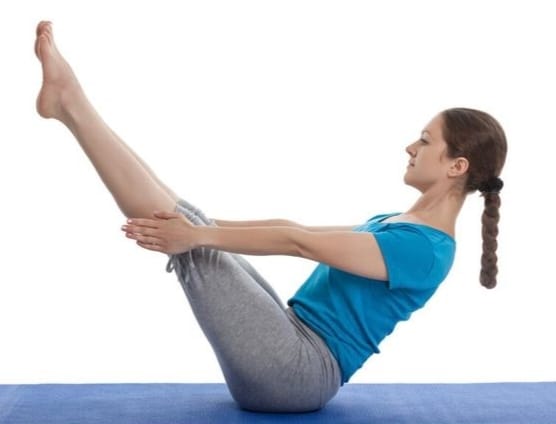
Boat Pose, or Navasana in Sanskrit, is a foundational yoga posture that builds core strength, improves balance, and enhances focus. The name “Navasana” comes from “Nava” meaning “boat” and “Asana” meaning “pose.” This dynamic pose mimics the shape of a boat floating on water and requires a combination of strength, stability, and mindfulness.
How to Perform Boat Pose (Navasana)
- Start in a Seated Position:
- Sit on your yoga mat with your legs extended straight in front of you.
- Place your hands on the mat beside your hips for support, keeping your spine long and chest lifted.
- Engage Your Core:
- Lean back slightly, ensuring your spine stays straight and your chest remains open.
- Avoid rounding your back or collapsing your chest.
- Lift Your Legs:
- Bend your knees and lift your feet off the mat, bringing your shins parallel to the floor. Your body should form a “V” shape.
- Balance on your sitting bones, keeping your core engaged to maintain stability.
- Extend Your Arms:
- Reach your arms forward, parallel to the floor, with your palms facing each other.
- Keep your shoulders relaxed and away from your ears.
- Straighten Your Legs (Optional):
- If you feel stable, straighten your legs to form a full Boat Pose. Your body will resemble an inverted “V” shape.
- Keep your toes pointed and legs active.
- Hold the Pose:
- Maintain the position for 20-30 seconds, breathing deeply and steadily. Gradually increase the duration as your strength improves.
- Release the Pose:
- Exhale as you lower your feet back to the mat and return to a seated position.
Benefits of Boat Pose
- Physical Benefits:
- Strengthens the Core: Targets the abdominal muscles, hip flexors, and lower back.
- Improves Balance: Enhances stability and coordination by requiring focus and control.
- Tones the Legs: Engages the quadriceps and hamstrings.
- Supports Posture: Strengthens the muscles that support good posture.
- Mental Benefits:
- Boosts Focus: Requires concentration to maintain balance and alignment.
- Reduces Stress: Encourages deep breathing, promoting a sense of calm and clarity.
- Energetic Benefits:
- Activates the Manipura Chakra: Stimulates the solar plexus chakra, enhancing confidence and personal power.
- Energizes the Body: Builds heat and revitalizes energy levels.
Modifications and Tips
- Bend the Knees: If straightening your legs is too challenging, keep your knees bent and shins parallel to the floor.
- Use a Strap: Place a yoga strap around your feet and hold the ends for support as you work on extending your legs.
- Support Your Hands: Keep your hands on the mat beside your hips for added stability if you’re a beginner.
- Focus on Alignment: Ensure your spine stays straight and your chest remains open throughout the pose.
Precautions
- Avoid this pose if you have recent or chronic injuries in the lower back, hips, or shoulders.
- Pregnant individuals should avoid Boat Pose, especially in later stages of pregnancy.
- If you have tight hamstrings or hip flexors, modify the pose by bending your knees or using props.
- Always listen to your body and stop if you experience pain or discomfort.
7. Cobra Pose (Bhujangasana)
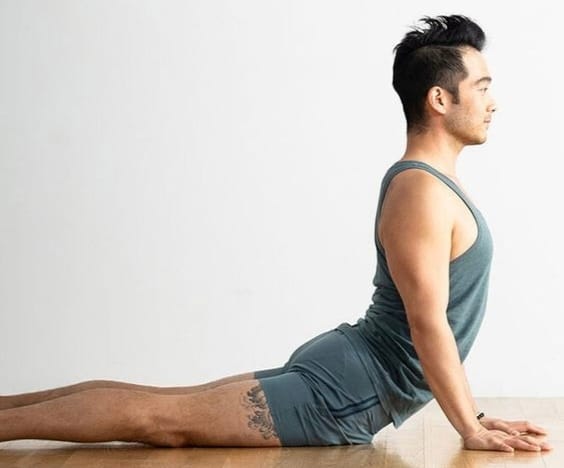
Cobra Pose, or Bhujangasana in Sanskrit, is a rejuvenating backbend that strengthens the spine, opens the chest, and enhances flexibility. Derived from “Bhujanga,” meaning “serpent” or “cobra,” and “Asana,” meaning “pose,” this posture resembles the graceful and alert stance of a cobra with its hood raised. It is a foundational pose in yoga, often included in sequences like Sun Salutations.
How to Perform Bhujangasana
- Start in a Prone Position:
- Lie flat on your stomach with your legs extended straight back and the tops of your feet resting on the mat.
- Place your hands under your shoulders, keeping your elbows close to your body.
- Engage Your Core and Legs:
- Press the tops of your feet, thighs, and pelvis firmly into the mat.
- Slightly engage your abdominal muscles to protect your lower back.
- Lift Your Chest:
- Inhale and slowly lift your head, chest, and ribs off the mat by pressing into your palms.
- Straighten your arms partially or fully, depending on your flexibility and comfort. Avoid locking your elbows.
- Keep your shoulders relaxed and away from your ears.
- Open Your Chest:
- Gently draw your shoulder blades together and down your back to open the chest.
- Look straight ahead or slightly upward, being mindful not to strain your neck.
- Hold the Pose:
- Breathe deeply and hold the pose for 15-30 seconds. Gradually increase the duration as your strength improves.
- Release the Pose:
- Exhale and slowly lower your chest and head back to the mat, resting your arms by your sides.
Benefits of Bhujangasana
- Physical Benefits:
- Strengthens the Spine: Enhances flexibility and strengthens the muscles supporting the spine.
- Opens the Chest: Improves lung capacity and aids in respiratory health.
- Stimulates Abdominal Organs: Promotes better digestion and alleviates constipation, unlock better digestion.
- Relieves Back Pain: Stretches the lower back and helps alleviate mild discomfort.
- Mental Benefits:
- Reduces Stress: Encourages deep breathing, which calms the mind and reduces anxiety.
- Improves Focus: Enhances concentration by promoting mindfulness and body awareness.
- Energetic Benefits:
- Activates the Anahata Chakra: Opens the heart chakra, fostering emotional balance and compassion.
- Boosts Vitality: Revitalizes energy levels and combats fatigue.
Modifications and Tips
- Use a Cushion: If your lower back feels strained, place a folded blanket under your hips for support.
- Partial Lift: Keep your elbows slightly bent and lift your chest only partially if you’re new to the pose or have limited flexibility.
- Hands-Off Variation: For a gentler backbend, lift your chest using the strength of your back muscles without pressing into your palms.
- Focus on Alignment: Avoid overarching your lower back or letting your elbows flare out.
Precautions
- Avoid this pose if you have severe back injuries, carpal tunnel syndrome, or recent abdominal surgery.
- Pregnant individuals should avoid deep backbends and consult a yoga instructor for suitable modifications.
- Move slowly and mindfully, especially if you’re new to yoga or recovering from an injury.
- If you feel pain or discomfort in your lower back, ease out of the pose and modify as needed.
8. Supine Spinal Twist (Supta Matsyendrasana)
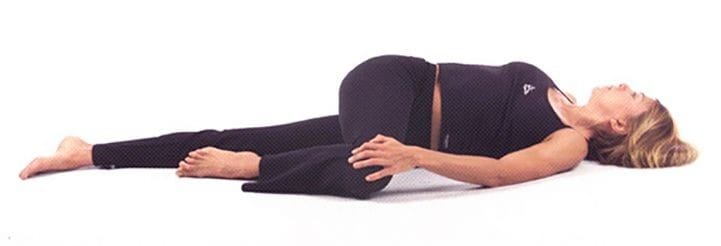
Supine Spinal Twist, or Supta Matsyendrasana in Sanskrit, is a restorative yoga pose that gently stretches the spine, massages the abdominal organs, and promotes relaxation. “Supta” means “reclined,” “Matsyendra” refers to the sage Matsyendra, and “asana” means “pose.” This twist is often included at the end of yoga sessions to release tension and prepare the body and mind for relaxation.
How to Perform Supta Matsyendrasana
- Start in a Supine Position:
- Lie flat on your back with your legs extended and arms resting by your sides.
- Bend Your Knee:
- Draw your right knee toward your chest while keeping your left leg extended on the mat.
- Guide the Twist:
- Use your left hand to guide your right knee across your body toward the left side.
- Allow your right hip to lift off the mat as your torso twists.
- Position Your Arms:
- Extend your right arm out to the side at shoulder height, with your palm facing up.
- Keep your left hand resting on your right knee or extend it out to the side for balance.
- Turn Your Head:
- Gently turn your head to the right, looking toward your extended arm. If this feels uncomfortable, keep your head neutral or turn it to the left.
- Relax and Breathe:
- Close your eyes and take slow, deep breaths, allowing your body to relax into the twist. Hold the pose for 30 seconds to 1 minute.
- Switch Sides:
- Inhale as you return to the center, extending both legs. Repeat the twist on the opposite side.
Benefits of Supta Matsyendrasana
- Physical Benefits:
- Stretches the Spine: Releases tension and enhances flexibility in the spinal column.
- Massages Internal Organs: unlock better digestion and promotes detoxification.
- Opens the Chest and Shoulders: Relieves tightness and improves posture.
- Eases Lower Back Pain: Provides gentle relief for discomfort in the lower back and hips.
- Mental Benefits:
- Promotes Relaxation: Calms the nervous system and reduces stress.
- Encourages Mindfulness: Fosters a connection between breath and body, enhancing awareness.
- Energetic Benefits:
- Balances Chakras: Aligns the Manipura (solar plexus) chakra, supporting emotional balance and personal power.
- Releases Stagnant Energy: Helps release blocked energy along the spine.
Modifications and Tips
- Support the Knee: If your knee doesn’t comfortably reach the floor, place a folded blanket, block, or bolster underneath for support.
- Adjust the Twist: Keep both shoulders grounded on the mat to avoid strain on the upper back and neck.
- Gentle Variation: If the full twist is too intense, keep your lower leg bent instead of extended.
- Use a Wall: Place your foot against a wall to stabilize your leg if needed.
- Focus on Comfort: Avoid forcing the twist—allow your body to relax naturally into the position.
Precautions
- Avoid this pose if you have severe spinal injuries, herniated discs, or recent abdominal surgery.
- Pregnant individuals should practice gentle variations with guidance from a qualified instructor.
- Move slowly and mindfully to avoid overstretching or straining.
- Discontinue the pose if you feel pain or discomfort.
Additional Practices for Enhanced Digestion:
- Pranayama (Breathwork): Techniques like Kapalabhati (Skull-Shining Breath) and Nadi Shodhana (Alternate Nostril Breathing) reduce stress and improve oxygen flow to the digestive organs.
- Mindfulness Meditation: Reduces stress, which is a common trigger for digestive issues.
- Lifestyle Tips: Stay hydrated, eat mindfully, and maintain a regular yoga practice for lasting benefits.
By incorporating these poses into your daily routine, you can naturally unlock better digestion, reduce stomach issues, and improve your overall well-being. For best results, practice yoga consistently and with mindfulness.
Some Importent Quetion
1. Can yoga help with bloating and constipation?
Yes, yoga can be very helpful in alleviating bloating and constipation. Many yoga poses are specifically designed to stimulate digestion, improve bowel movement, and relieve the discomfort associated with bloating and constipation. Here’s how yoga can help and which poses are most beneficial:
2. How Yoga Helps with Bloating and Constipation:
- Improves Digestion: Yoga poses can stimulate the digestive organs, helping to increase the flow of energy and improve the digestive process.
- Relieves Gas and Tension: Certain postures can help release trapped gas, which is a common cause of bloating.
- Stimulates the Abdomen: Many yoga poses involve gentle compression of the abdomen, which can stimulate peristalsis (the rhythmic contraction of the intestines), promoting bowel movements.
- Reduces Stress: Stress is a major factor in digestive issues. Yoga helps calm the nervous system, reducing stress and anxiety, which can have a positive impact on digestion.
- Enhances Blood Flow: Poses that encourage circulation to the abdominal area support the body’s natural detoxification processes.
Effective Yoga Poses for Bloating and Constipation:
1. Apanasana (Knees-to-Chest Pose)

- How it helps: This gentle pose helps to release trapped gas and stimulates the abdominal organs, aiding in digestion, unlock better digestion and promoting bowel movements.
- How to do it:
- Lie on your back with your knees bent and feet flat on the floor.
- Bring your knees toward your chest and hug them with your arms.
- Gently rock from side to side, breathing deeply.
- Hold for 30 seconds to 1 minute.
2. Reclined Bound Angle Pose (Supta Baddha Konasana)
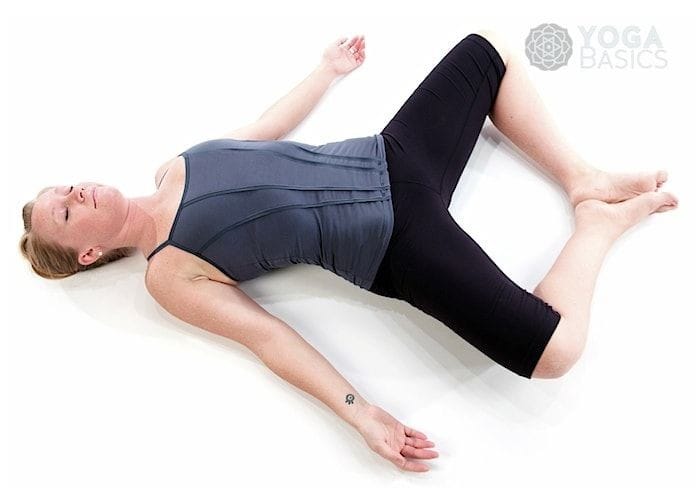
This pose helps relax the abdominal muscles, reduce tension, unlock better digestion.
How to Perform:
- Lie on your back and bring the soles of your feet together, letting your knees fall open.
- Place your hands on your belly or by your sides.
- Breathe deeply and hold for 1-2 minutes.
3. Twists (Ardha Matsyendrasana, Seated Twist)
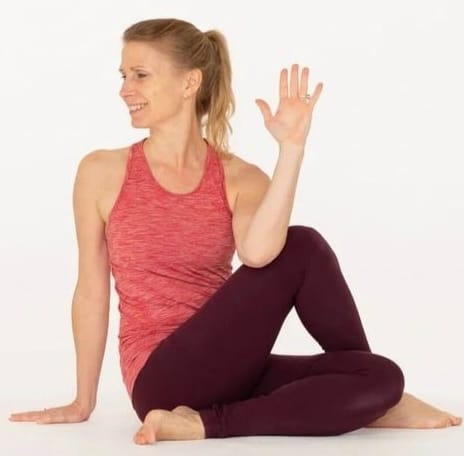
- How it helps: Twisting poses massage the abdominal organs, helping to relieve constipation and improve digestion by increasing circulation and stimulating peristalsis.
- How to do it:
- Sit on the floor with your legs extended.
- Bend your right knee and place your right foot outside your left knee.
- Twist your torso to the right, placing your left elbow outside your right knee.
- Hold for 30 seconds and repeat on the other side.
4. Legs Up the Wall (Viparita Karani)
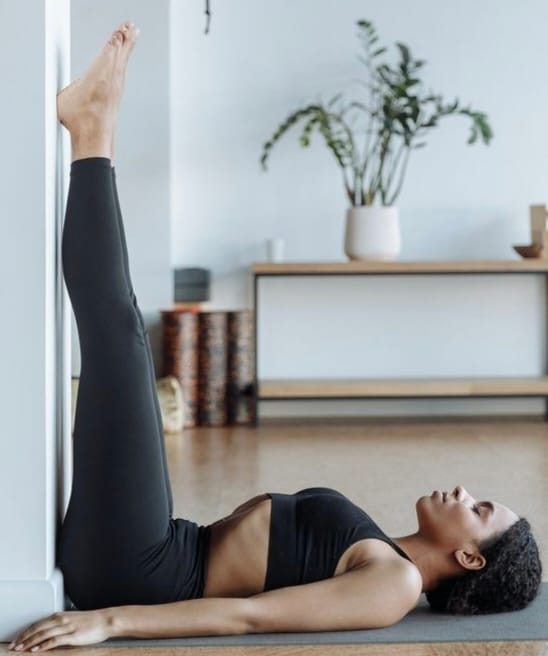
- How it helps: This pose promotes relaxation and enhances blood flow to the digestive organs, which can help relieve constipation, unlock better digestion.
- How to do it:
- Sit next to a wall and lie on your back, swinging your legs up against the wall.
- Relax your arms by your sides, close your eyes, and breathe deeply.
- Hold for 5-10 minutes to help your body relax and aid in digestion.
5. Downward-Facing Dog (Adho Mukha Svanasana)
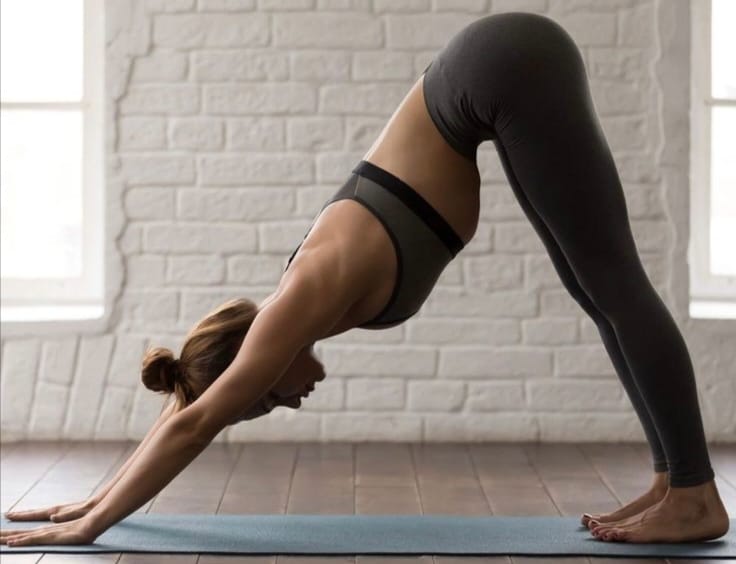
- How it helps: This pose lengthens the spine and stimulates the abdominal organs, which can help improve digestion and reduce bloating.
- How to do it:
- Start on your hands and knees.
- Lift your hips up and back, forming an inverted V-shape with your body.
- Keep your hands and feet shoulder-width apart and engage your core.
- Hold for 30 seconds to 1 minute, breathing deeply.
There are many other Yogas which provide relief from bloating and constipation like- Seated forward bend, Cat Cow stetch, Wind reliving pose, Child’s Pose.
Additional Tips:
- Breathe deeply: Focusing on deep, diaphragmatic breathing (such as with pranayama) helps stimulate digestion and reduce bloating.
- Practice regularly: Consistency is key in relieving constipation and bloating through yoga.
- Hydrate: Drink plenty of water, especially after yoga, to support the digestive process.
- Listen to your body: If a pose causes discomfort or worsens bloating, stop and modify as needed.
Yoga can be a gentle yet powerful tool to support your unlock better digestion digestive health. However, if you have chronic or severe digestive issues, it’s always a good idea to consult a healthcare professional to rule out underlying conditions.
3. Which yoga poses are effective for relieving stomach pain?
Yoga offers gentle, natural relief for stomach pain by reducing tension, improving circulation, and stimulating the digestive organs. Here are the most effective yoga poses for relieving stomach pain. Stomach pain can stem from issues like indigestion, gas, bloating, or cramps. Instead of reaching for medication, yoga offers a natural, soothing solution by massaging your internal organs, improving circulation, and reducing stress. Below are the most effective yoga poses to ease stomach discomfort:
1. Reclined Spinal Twist (Supta Matsyendrasana)
A relaxing pose that gently massages the abdominal organs and relieves tension in the lower back and stomach.
Why It Works: Twisting compresses and detoxifies the digestive organs, alleviating discomfort and bloating, unlock better digestion.
How to Do It:
- Lie on your back and bring your right knee toward your chest.
- Let your knee drop over to the left while keeping your shoulders grounded.
- Stretch your right arm out to the side and look toward it.
- Hold for 1-2 minutes, then switch sides.
2. Happy Baby Pose (Ananda Balasana)
A playful pose that gently stretches the lower abdomen and alleviates tension, making it excellent for cramping or gas.
Why It Works: This pose opens the hips and massages the lower abdomen, releasing tension and promoting relaxation.
How to Do It:
- Lie on your back and bend your knees toward your chest.
- Hold the outer edges of your feet with your hands.
- Gently rock side to side to massage your lower back and abdomen.
3. Supine Bound Angle Pose(Supta Baddha Konasana)
A deeply relaxing pose that stretches the inner thighs and opens up the abdomen, relieving tension and pain.
Why It Works: This pose allows your body to relax fully, reducing stress-related stomach pain and improving blood flow to the digestive organs,and unlock better digestion.
How to Do It:
- Lie on your back and bring the soles of your feet together.
- Let your knees fall open to the sides.
- Rest your hands on your stomach or by your sides.
- Breathe deeply for 2-3 minutes.
There are many more poses available which are very beneficial in this desease like- 1. Seated forward bend, 2. Cat Cow Stretch Wind Reliving Pose, 3. child’s pose, 4. Boat pose, 5. Cobra Pose. etc
Bonus Tips for Relieving Stomach Pain:
Timing: Practice yoga on an empty stomach or at least 2-3 hours after a meal for the best results.
Breathing Techniques (Pranayama): Deep breathing, such as Diaphragmatic Breathing or Nadi Shodhana (Alternate Nostril Breathing), calms the nervous system and reduces stress-related stomach pain.
Hydration: Ensure you’re drinking enough water throughout the day to prevent cramping caused by dehydration.
4. Is yoga a natural remedy for indigestion?
Yes, yoga is an effective and natural remedy for indigestion. It works by stimulating the digestive organs, improving blood circulation, unlock better digestion and reducing stress—factors that play a significant role in gut health. Unlike medications that often provide temporary relief, yoga addresses the root causes of indigestion holistically, making it a sustainable and side-effect-free solution.
5. How Yoga Helps with Indigestion
- Stimulates Digestive Organs
Certain yoga poses gently compress and massage the stomach and intestines, stimulating digestive enzymes and improving peristalsis (the movement of food through the digestive tract). - Improves Blood Flow
Yoga increases blood circulation to the abdominal region, ensuring better oxygenation and nutrient supply to the digestive organs. - Reduces Stress
Stress is a common cause of indigestion. Yoga’s focus on deep breathing and relaxation calms the nervous system, reducing stress-induced digestive issues like acid reflux, bloating, and cramping. - Enhances Gut-Brain Connection
Yoga helps balance the gut-brain axis by reducing cortisol levels and improving vagus nerve function, which is directly linked to digestion.
Additional Yoga Techniques for Indigestion
- Pranayama (Breathing Exercises):
- Kapalabhati (Skull-Shining Breath): Stimulates the digestive fire and clears toxins.
- Nadi Shodhana (Alternate Nostril Breathing): Calms the mind and improves overall digestion.
- Meditation:
- Regular meditation reduces stress and improves mindfulness, helping you avoid overeating or poor dietary choices.
Tips for Using Yoga to Relieve Indigestion
- Practice on an empty stomach or at least 2-3 hours after eating.
- Stay hydrated to aid the digestive process.
- Combine yoga with mindful eating and a balanced diet for better results.
- Practice consistently to see long-term improvements.
6. What are the benefits of yoga for gut health?
Yoga offers numerous benefits for gut health by improving digestion, reducing inflammation, and enhancing the mind-body connection. Here’s a breakdown of how yoga supports a healthier gut:
1. Improves Digestion
Yoga poses that involve twists, forward bends, and stretches stimulate the digestive organs and unlock better digestion, promoting the efficient breakdown and absorption of food. By increasing blood flow and oxygenation to the stomach and intestines, yoga helps relieve issues like indigestion, bloating, and constipation.
Key Poses:
- Seated Forward Bend (Paschimottanasana): Compresses the abdomen to aid digestion.
- Supine Spinal Twist (Supta Matsyendrasana): Massages the intestines and detoxifies the digestive organs.
2. Relieves Bloating and Gas
Certain yoga poses gently compress and stretch the abdominal muscles, helping to release trapped gas and reduce bloating. This is particularly beneficial for those with irregular digestion or digestive discomfort after meals.
Key Poses:
- Wind-Relieving Pose (Pawanmuktasana): Releases trapped gas and eases abdominal tension.
- Child’s Pose (Balasana): Promotes relaxation and relieves stomach pressure.
3. Reduces Stress and Anxiety
Stress is one of the leading contributors to gut issues, as it disrupts the gut-brain connection and triggers symptoms like acid reflux, IBS (Irritable Bowel Syndrome), or inflammation. Yoga’s focus on mindful breathing and relaxation lowers cortisol levels, soothing the nervous system and creating a healthier environment for digestion.
Key Techniques:
- Meditation: Improves gut-brain communication.
- Pranayama (Breathing Exercises): Reduces stress and promotes calm digestion.
4. Balances the Gut Microbiome
A healthy gut microbiome is essential for digestion, immunity, and overall health. Yoga helps indirectly balance gut bacteria by reducing inflammation, supporting better circulation, and improving the body’s ability to absorb nutrients and unlock better digestion..
Supporting Yoga Practices:
- Gentle yoga flows combined with a healthy diet can optimize gut health.
5. Boosts Gut-Brain Connection
The gut and brain are deeply interconnected via the vagus nerve. Yoga improves vagus nerve function, which enhances communication between the gut and the brain, reducing symptoms of IBS, anxiety, and other gut-related disorders.
Key Practices:
- Yoga Nidra (Yogic Sleep): Calms the nervous system and strengthens gut-brain harmony.
- Alternate Nostril Breathing (Nadi Shodhana): Regulates the nervous system for optimal gut health.
6. Alleviates Constipation
By improving circulation and stimulating peristalsis (intestinal contractions), yoga can help regulate bowel movements and alleviate constipation.
Key Poses:
- Bow Pose (Dhanurasana): Stimulates the digestive organs and improves gut motility.
- Cobra Pose (Bhujangasana): Relieves tension in the abdominal muscles and stimulates digestion.
7. Reduces Inflammation
Chronic gut inflammation can lead to issues like leaky gut, Crohn’s disease, or ulcerative colitis. Yoga’s ability to lower stress, combined with gentle physical movement, helps reduce inflammatory markers in the body.
Key Practices:
- Restorative Yoga: Calms the body and reduces inflammation.
- Yin Yoga: Promotes relaxation and healing in the digestive system.
8. Enhances Nutrient Absorption
By improving blood circulation to the digestive organs and reducing stress, yoga helps your body absorb nutrients more efficiently, ensuring your gut has the resources it needs for optimal function.
Supporting Pose:
- Supine Bound Angle Pose (Supta Baddha Konasana): Enhances relaxation and digestion, aiding nutrient uptake.
9. Encourages Healthy Eating Habits
Regular yoga practice encourages mindfulness, which extends to eating habits. By eating mindfully and reducing emotional eating, you can prevent overeating, indigestion, and other gut-related issues.
Key Practice:
- Mindful Eating Meditation: Helps improve awareness of hunger and satiety signals.
10. Supports Detoxification
Yoga poses stimulate the liver, kidneys, and other detoxifying organs, helping to remove toxins from the body. A clean internal system is vital for a healthy gut.
Key Poses:
- Twisted Chair Pose (Parivrtta Utkatasana): Detoxifies the digestive organs.
- Revolved Triangle Pose (Parivrtta Trikonasana): Stimulates digestion and aids detoxification.
Can beginners do yoga for digestive issues?
Yes, beginners can absolutely do yoga for digestive issues! Yoga is highly adaptable and offers poses that are safe and effective for people of all fitness levels, including those who are just starting out. Many yoga poses designed to improve digestion are simple, gentle, and easy to perform, making them ideal for beginners.
7. Why Yoga is Perfect for Beginners with Digestive Issues
- Gentle on the Body:
Yoga involves slow and controlled movements that don’t strain the body, making it accessible to people of all ages and fitness levels. - Promotes Relaxation:
Stress is a major contributor to digestive issues, and yoga’s focus on deep breathing and mindfulness helps calm the nervous system and improve digestion. - No Equipment Required:
Yoga can be practiced at home with just a mat, making it a convenient and affordable way to address digestive concerns.
Beginner-Friendly Yoga Poses for Digestive Health
Here are some simple and effective poses that beginners can try to alleviate digestive issues:
Tips for Beginners Starting Yoga for Digestion
- Start Slow:
Begin with 5-10 minutes of practice daily and gradually increase the duration as you feel comfortable. - Practice on an Empty Stomach:
Avoid practicing yoga immediately after eating. Wait at least 2-3 hours after a meal. - Focus on Breathing:
Deep, mindful breathing enhances relaxation and supports digestion. - Listen to Your Body:
Never push yourself into a pose that feels uncomfortable. Yoga is about progress, not perfection. - Be Consistent:
Regular practice, even for a few minutes each day, is key to seeing results.
8. What is the connection between stress, digestion, and yoga?
Stress, digestion, and yoga are intricately connected through the interplay of the nervous system, hormonal balance, and physical well-being. Here’s how these elements are linked:
1. Stress and Digestion
- The Stress Response: When you experience stress, the body activates the “fight or flight” response, governed by the sympathetic nervous system. This response directs energy toward immediate survival (e.g., increased heart rate, heightened alertness) and away from non-essential functions like digestion.
- Digestive Issues: Chronic stress can lead to digestive problems such as bloating, indigestion, constipation, diarrhea, or conditions like irritable bowel syndrome (IBS). Stress reduces blood flow to the digestive tract, impairs nutrient absorption, and disrupts the gut-brain axis, which is the communication network between the brain and gut.
2. Yoga’s Role in Stress Management
- Activating the Parasympathetic Nervous System: Yoga emphasizes deep breathing, relaxation, and mindfulness, which activate the parasympathetic nervous system, also known as the “rest and digest” system. This helps counteract the effects of chronic stress.
- Regulating Cortisol Levels: Yoga has been shown to lower cortisol, the primary stress hormone. Elevated cortisol can disrupt digestion by altering gut motility and increasing inflammation.
- Mindfulness and Awareness: Yoga cultivates mindfulness, encouraging individuals to notice how emotions and stress affect their body, including the digestive system. This awareness can help in identifying and addressing triggers.
3. Yoga’s Direct Impact on Digestion
- Improved Circulation: Yoga postures (asanas) improve blood flow to the digestive organs, enhancing their function and unlock better digestion..
- Stimulating the Digestive System: Certain poses, like twists (e.g., Ardha Matsyendrasana) and forward bends (e.g., Paschimottanasana), massage the abdominal organs, promoting peristalsis (the movement of food through the intestines) and relieving constipation.
- Reducing Inflammation: Stress-related inflammation in the gut can be alleviated by yoga’s calming effects and its ability to balance the body’s internal systems.
4. Holistic Benefits
- Better Eating Habits: Yoga encourages mindfulness not just on the mat but also in daily life. This can lead to more mindful eating practices, better food choices, and improved digestion.
- Balancing Gut Health: Stress often disrupts the balance of gut microbiota. Yoga’s stress-relieving effects can indirectly support a healthier gut environment.
Key Practices to Connect Stress, Digestion, and Yoga
- Pranayama (Breathwork): Techniques like Nadi Shodhana (alternate nostril breathing) and Bhramari (humming bee breath) calm the mind and improve vagal tone, supporting digestion.
- Relaxation Poses: Savasana (corpse pose) and restorative yoga practices reduce stress and promote relaxation.
- Meditation: Regular meditation helps manage chronic stress and its impact on digestion.
- Gentle Asanas: Sequences like Cat-Cow Pose (Marjaryasana-Bitilasana) and Supine Twist (Supta Matsyendrasana) can soothe the digestive organs.
By integrating yoga into daily life, you can create a harmonious balance between the mind and body, reducing stress and enhancing digestion. Would you like me to recommend specific yoga routines or breathing exercises for stress and digestion?
9. Which pranayama techniques improve digestion?
Pranayama (breathing exercises) can be highly effective in improving digestion by promoting relaxation, reducing stress, and stimulating the digestive system. Here are some pranayama techniques that specifically benefit digestion:
10. Are there any risks to doing yoga for stomach problems?
Yoga can be highly beneficial for stomach problems, as it helps with digestion, stress reduction, and improving circulation. However, there are some risks if it’s not done properly or if certain conditions are present. Here are a few considerations:
- Overstretching or Incorrect Poses: Some yoga poses, if performed incorrectly, may strain the abdominal muscles or exacerbate certain digestive issues. It’s important to practice proper alignment and avoid overextending yourself.
- Increased Pressure: Certain poses, such as those that involve heavy twisting or deep backbends, can put increased pressure on the abdomen, which may not be suitable for people with conditions like hernias, acid reflux, or ulcers.
- Acid Reflux: If you have gastroesophageal reflux disease (GERD), certain poses that invert the body or bend forward could worsen symptoms by allowing stomach acid to flow into the esophagus.
- Pre-existing Conditions: If you have chronic conditions like irritable bowel syndrome (IBS), Crohn’s disease, or ulcers, some yoga poses may trigger discomfort, so it’s important to avoid any movements that feel aggravating.
- Breathing Techniques: While pranayama (breathing exercises) can be beneficial for digestion, some types of breathing techniques (like kapalbhati) may not be suitable for those with abdominal or breathing-related problems. Always check with your healthcare provider before starting any intense pranayama practices.
- Too Much Intensity: If yoga is practiced too intensely or too frequently, it can potentially cause muscle strain, or overstress the digestive system, especially if the body is not used to regular physical activity.
Best Practices:
- Focus on gentle, restorative poses that encourage deep breathing and relaxation.
- Avoid twisting or compressing the abdomen too much, especially after eating.
- Consider starting with beginner classes or guided instruction to ensure you are practicing safely.
- Listen to your body and stop immediately if you feel any discomfort or pain.
Lifestyle Tips for Enhanced Digestion with Yoga
- Practice on an Empty Stomach: Perform these poses at least 2-3 hours after a meal for optimal results.
- Stay Consistent: Regular practice is key to experiencing long-term digestive health benefits.
- Hydrate: Drink plenty of water throughout the day to support your digestive system.
- Combine with a Healthy Diet: Pair yoga with a balanced diet rich in fiber, probiotics, and whole foods.
- Add Breathing Exercises: Incorporate pranayama techniques like deep belly breathing to further enhance digestion.
- Listen to Your Body: Avoid pushing yourself into discomfort. Modify poses as needed and focus on your breath.
The Final Word on Yoga for Unlock Better Digestion.
Improving digestion doesn’t have to rely solely on medication or restrictive diets. Yoga offers a holistic, natural solution to common stomach issues like bloating, indigestion, and constipation. By incorporating these powerful yoga poses into your routine, you’ll not only unlock better digestion but also enhance your overall well-being. Start your journey toward a healthier gut today—your body will thank you!
Additional Yoga Practices for Gut Health
Breathing Techniques for Unlock Better Digestion.
Pranayama, or yogic breathing, can play a significant role in improving digestion by reducing stress and enhancing oxygen flow to the abdominal organs. Techniques like Nadi Shodhana (Alternate Nostril Breathing) and Kapalabhati (Skull-Shining Breath) are particularly effective.
Meditation for Stress-Free Digestion
Stress is a major contributor to digestive issues. Incorporating mindfulness meditation into your routine can help calm the mind and body, creating an optimal environment for digestion.
Tips to Maximize the Benefits of Yoga for Unlock Better Digestion.
- Practice on an empty stomach: Avoid practicing yoga immediately after a meal. Wait at least 2-3 hours after eating.
- Stay hydrated: Drink plenty of water throughout the day to support digestion.
- Breathe mindfully: Deep, conscious breathing during yoga helps relax the nervous system and enhances the digestive process.
- Be consistent: Regular practice is key to reaping the long-term benefits of yoga.
Conclusion
Yoga is more than just a physical practice—it’s a powerful tool to unlock better digestion health and overall well-being. By incorporating specific yoga poses into your routine, you can naturally alleviate bloating, constipation, and other digestive discomforts while nurturing your gut health. These poses not only stimulate the digestive organs but also reduce stress, a common culprit behind many digestive issues.
The beauty of yoga lies in its holistic approach—combining movement, breath, and mindfulness to create harmony within the body. Whether you’re a beginner or an experienced practitioner, consistency is key to unlocking its benefits. Dedicate just a few minutes each day to these effective poses, and you’ll find relief, improved digestion, and a greater sense of balance in your life.
Remember, yoga is a journey, not a quick fix. With patience, practice, and persistence, you’ll be on your way to a healthier, happier gut—and a healthier, happier you. 🌿✨
RELATED POSTS
View all


